前言
对于许多同学,可能需要在linux上运行专业软件,或者有较多编程工作,那么ubuntu(linux的一个发行版)是一个比较合适的入门选择。但即使是ubuntu,对于初学者也并不友好,不太符合大家的使用习惯。好在经过一些配置后,ubuntu还基本可以满足办公需求,比如写个文档,发微信等。其次,gnu/linux是开源的,上面运行的很多软件也是开源的,可以避免一些商业软件的版权问题。在如今,在单边主义盛行的国际形势下,也必将有越来越多的人选择linux,拥抱开源,未雨绸缪。
本文即是针对ubuntu新手的一份基础配置使用指南。
关于安装
没有装过系统的同学建议来科服安装,以确保万无一失。
1.镜像
镜像仓库:mirrors.tuna.tsinghua.edu.cn
建议选择LTS版本,桌面版,如果没有特殊要求直接选择最新的20版,即ubuntu-20.04.1-desktop-amd64.iso,本文的配置完全适用于ubuntu20.04,其他版本部分配置需要做一些调整。
2.安装盘
linux下直接用dd命令烧录到U盘。win下需要下载烧录软件,推荐balenaEtcher ,rufus, 软碟通,ventoy。
3.其他建议
- 系统语言建议使用英文,中文在后续使用容易出问题
- 安装时建议勾选minimum installation,勾选install third-party software for graphics and Wi-Fi hardware and additional media formats
- 如果是双系统建议直接勾选install alongside with window,然后会让你选择给Ubuntu的空间,然后会自动分区。
- 建议密码设置简单些,因为后续使用会经常输入密码来提升权限。足够熟练后可以直接进
root用户,或者取消sudo输入密码。
不过如果平时习惯给电脑休眠(hibernate,将使用状态存到硬盘,然后关机),那么还是得自己分区,并且需要一个大于内存大小的swap分区。
换源
先联网,然后换源(指apt软件管理器软件源)以提升软件下载速度。需要在
https://mirrors.tuna.tsinghua.edu.cn/help/ubuntu/
中选择ubuntu版本 ,复制框内所有命令,替换sources.list里的内容
对于ubuntu20.04是这些:
1
2
3
4
5
6
7
8
9
10
11
12
13
# 默认注释了源码镜像以提高 apt update 速度,如有需要可自行取消注释
deb https://mirrors.tuna.tsinghua.edu.cn/ubuntu/ focal main restricted universe multiverse
# deb-src https://mirrors.tuna.tsinghua.edu.cn/ubuntu/ focal main restricted universe multiverse
deb https://mirrors.tuna.tsinghua.edu.cn/ubuntu/ focal-updates main restricted universe multiverse
# deb-src https://mirrors.tuna.tsinghua.edu.cn/ubuntu/ focal-updates main restricted universe multiverse
deb https://mirrors.tuna.tsinghua.edu.cn/ubuntu/ focal-backports main restricted universe multiverse
# deb-src https://mirrors.tuna.tsinghua.edu.cn/ubuntu/ focal-backports main restricted universe multiverse
deb https://mirrors.tuna.tsinghua.edu.cn/ubuntu/ focal-security main restricted universe multiverse
# deb-src https://mirrors.tuna.tsinghua.edu.cn/ubuntu/ focal-security main restricted universe multiverse

# 预发布软件源,不建议启用
# deb https://mirrors.tuna.tsinghua.edu.cn/ubuntu/ focal-proposed main restricted universe multiverse
# deb-src https://mirrors.tuna.tsinghua.edu.cn/ubuntu/ focal-proposed main restricted universe multiverse
使用快捷键ctrl+alt+T进入命令行:
1
2
3
4
5
6
sudo cp /etc/apt/sources.list /etc/apt/sources.list.bak#备份
sudo apt install vim
sudo vim /etc/apt/sources.list  #换源,insert键切换到插入模式
sudo apt update #将更新传给apt(即软件管理器)
sudo apt upgrade  #更新软件和内核
sudo apt autoremove  #清除不再需要的依赖
配置中文输入法
1
2
3
4
5
sudo apt install curl
curl -sL 'https://keyserver.ubuntu.com/pks/lookup?&op=get&search=0x73BC8FBCF5DE40C6ADFCFFFA9C949F2093F565FF' | sudo apt-key add
sudo apt-add-repository 'deb http://archive.ubuntukylin.com/ukui focal main'
sudo apt upgrade
sudo apt install sogouimebs
打开language support(初次打开可能会提示让你安装,点击install即可):
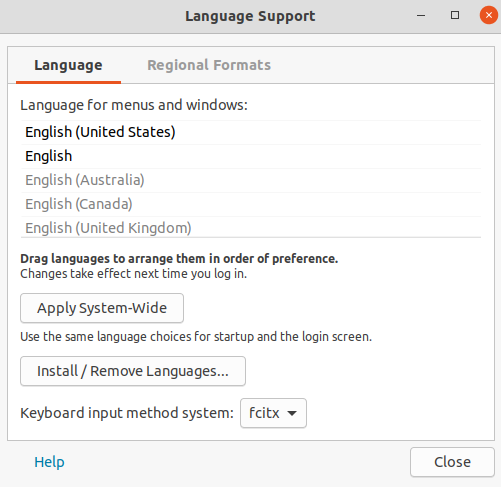
将Keyboard input method system切换为fcitx。然后重启即可使用搜狗输入法。
注:为防止后续ibus冲突出现问题,可以禁用ibus:
1
sudo dpkg-divert --package im-config --rename /usr/bin/ibus-daemon
配置终端
这里小编建议直接使用组合:terminator做终端, zsh作为shell, 配以0h-my-zsh工具加插件若干,可以实现的功能如下:
兼容bash,智能补全,解压缩,跳转,通用别名,插件管理等等
配置如下:
1
2
3
4
5
6
7
8
sudo apt install terminator   #然后重开终端
sudo apt-get install zsh git
sudo chsh -s /bin/zsh  #设置zsh为默认shell,可能需要重启才能生效
echo $SHELL  #输出/bin/zsh 则说明zsh切换成功
wget https://github.com/robbyrussell/oh-my-zsh/raw/master/tools/install.sh -O - | sh  安装oh-my-zsh
cd ~/.oh-my-zsh/
git clone https://github.com/zsh-users/zsh-autosuggestions.git
git clone https://github.com/zsh-users/zsh-syntax-highlighting.git
然后进入zsh的配置文件.zshrc, 找到plugins=(插件) 这句话,切换到插入模式,在括号添加这些插件(空格或空行隔开每个插件,一开始只有git插件):
1
2
3
4
extract   #解压各种格式压缩文件
z #根据使用历史,比如xxx为一个路径的关键词,直接"z xxx"就可以跳转到该路径参考:https://github.com/rupa/z/
zsh-autosuggestions #补全
zsh-syntax-highlighting  #语法&高亮
然后退出文件保存,进入命令行:
1
source ~/.zshrc
更多插件可以探索下:~/.oh-my-zsh/plugins
以及官方插件列表
微信
1
2
3
4
5
wget -qO- https://raw.githubusercontent.com/wszqkzqk/deepin-wine-ubuntu/master/online_install.sh | bash -e    #待定,用zsh?
cd ~/Downloads
wget https://mirrors.aliyun.com/deepin/pool/non-free/d/deepin.com.wechat/deepin.com.wechat_2.6.8.65deepin0_i386.deb
sudo apt install ./deepin.com.wechat_2.6.8.65deepin0_i386.deb   #安装
sudo apt-get install libjpeg62:i386    #解决微信发图片问题
注1:可能出现中文乱码,这是由于系统非中文语言环境,在 /opt/deepinwine/tools/run.sh中将 WINE_CMD 那一行修改为 WINE_CMD=”LC_ALL=zh_CN.UTF-8 deepin-wine” (新版似乎已经解决这个问题)
注2:可能无法使用视频通话功能,小编已提issue,开发者还未回复
使用过程有任何问题请查看官方网站 ,查看issues,提issue
rm误删除问题
安装trash-cli:
1
sudo apt install trash-cli
功能有:
trash-put: 删除文件和目录(仅放入回收站中)
trash-list :列出被删除了的
trash-restore:从回收站中恢复
trash-rm:删除回收站中的
trash-empty:清空回收站
为了方便使用将以下别名设置加入 ~/.zshrc文件最后:
1
2
3
4
5
6
alias rm='trash-put'
alias rml='trash-list'
alias rmr='trash-restore'
alias rmrm='trash-rm'
alias rme='trash-empty'
alias rmt='/bin/rm'    #系统的rm,建议且只建议在批量删除或删除大文件时使用(速度较快),其他时候都使用 rm
其它基础软件安装
安装方式
主要分为直接apt安装,deb包安装,源码编译安装(大部分专业软件)。也有部分软件是加源安装,和apt安装类似,但是需要给apt添加仓库
apt安装
较为简单,直接命令行即可
1
sudo apt install xxx
deb包安装
上官网,找到linux版本,和电脑架构相同的,下载到Downloads,命令如下:
1
2
cd Downloads
sudo apt install ./xxx.###### 源码编译安装
源码编译安装
一般过程为:
1
安装依赖->configure/cmake->make->make install
具体的安装过程参阅官网文档,以及源码里的README文件。
推荐软件如下
| 基础类 | 备注 |
|---|---|
| WPS | linux下免费,学习办公必备 |
| chrome | |
| 网易云 | |
| xmind | 做思维导图 |
| master pdf editor | linux下免费,可以编辑pdf,平时看pdf用默认软件即可 |
| 有道云词典 | |
| 百度网盘 | |
| typora | 做Markdown笔记,实时预览,可以配置gitee图床和文档同步 |
| 科研类 | 备注 |
|---|---|
| rstdio | 统计分析,其中rmarkdown很好用。 |
| matlab | 学校its上有资源 |
| vscode | 扩展性很棒,编程必备 |
| zotero | 文献管理 |
| dia | 画流程图 |
| mathpix snipping tool | 公式拍照转成latex代码 |
| kite | 各种编程辅助功能 |
| anaconda | 强烈推荐,丰富的库和强大的conda |
| 工具类 | 备注 |
|---|---|
| gparted | 硬盘使用情况查看,分区 |
| 瞩目会议 | 良心的会议软件 |
| kazam | 录屏,视频格式在win上不兼容 |
| simplescreenrecorder | 录屏,配合kazam |
| htop | top升级版,看后台 |
| teamviewer | 远程 |
| screenfetch | 看电脑系统和硬件信息 |
| Davinci resolve | 剪辑,对标pr,但部分编码不支持,需转码 |
此外,ubuntu下还有很多有意思的软件,以及开源项目可以玩,比如可以看星空的stellarium(apt安装),一些有意思的命令行小玩具:sl(apt安装), cmatrix(apt安装),dyego/snake-game(用docker装)。更多项目参见github,dockerhub。
shell 配置
从win迁移过来的同学可能很不习惯ubuntu桌面,我们可以通过配置gnome-shell插件来解决,能实现的功能包括显示各种硬件参数,下边栏,剪贴板历史显示,网速显示等。
配置很简单,首先需要在chrome应用商店安装GNOME Shell integration,然后打开插件,搜索插件名即可安装。可能需要在Tweaks中重启一下才能生效。
推荐插件
| 插件 | 介绍 |
|---|---|
| User Themes | 给gnome换主题 |
| Vitals | 在顶栏显示内存、负载、CPU使用率等信息 |
| Internet Speed Meter | 在顶栏显示网速 |
| Clipboard Indicator | 显示复制粘贴的历史,还可以永久保存某次复制历史 |
| Dash to Dock | 将gnome左侧的dash变成类似于MacOS的dock |
| Dynamic Panel Transparency | 顶栏透明插件,可以设置只有桌面的顶栏透明 |
| Todo.txt | 一个顶栏 todo 列表,在专心做一件事但又临时有东西要记时就很有用 |
| Remove Alt+Tab Delay v2 | 去除按下 Alt+Tab 时的 0.15 秒前摇 |
取消自启动蓝牙
当然是为了省电
首先添加脚本rc.local
1
sudo vim /etc/rc.local
输入以下内容:
1
2
3
#!/bin/sh
rfkill block bluetooth
exit 0
给rc.local加上权限
1
sudo chmod +x /etc/rc.local
然后重启即可生效
个性化配置
ubuntu命令行很有意思的地方便是个性化定制
shell别名设置
即用更简短的命令来代替复杂的命令,是一种偷懒的好方法。用好可以大大提升效率,这里给出一些建议。
复制下面内容到~/.zshrc文档最后,然后source ~/.zshrc即可
1
2
3
4
5
6
7
8
9
10
11
12
13
14
15
16
17
alias cl='clear'  #清空当前界面
alias v='vim'
alias szsh='source ~/.zshrc'   #加载zshrc
alias czsh="vim ~/.zshrc"   #进入zshrc
alias -s py=vim  #在命令行直接输入python文件,会用vim中打开。即alias通用别名。/如果习惯使用vscode,把vim替换为code即可
alias -s cc=vim
alias -s c=vim
alias -s R=vim
alias -s hh=vim
alias -s hh=vim
alias -s txt=vim
alias -s jpeg=xdg-open
alias -s png=xdg-open
#其他设置
alias dir='xdg-open .'  #打开当前文件夹
alias cdd='cd ~/Desktop'  #进入桌面
alias shutdown='shutdown -h now'  #立即关机,而不是等待60s
rc.local脚本
比如前文开机关闭蓝牙,这里可以实现其他你想要做的开机任务,比如开机bt做种等等
crontab脚本
可以实现定时任务,比如每天定时23点关机,只需要:
1
0 23 * * * shutdown -h now
常见问题
win更新导致grub引导丢失
用ubuntu安装盘进入试用,联网,然后进入命令行
1
2
3
4
5
sudo apt-get update  # 先更新版本高库,再执行下面
sudo add-apt-repository ppa:yannubuntu/boot-repair  #添加源
sudo apt-get install -y boot-repair
boot-repair   #直接用recommended repair
#如果文件系统损坏,则还需要repair file system
终端光标消失
1
2
3
4
#隐藏光标
echo -e "\033[?25l"
#显示光标
echo -e "\033[?25h"
无法调整亮度
即无法识别显卡,一般更新内核即可(默认内核可能会很老)
1
sudo apt upgrade
如果不行,则需要上网查找beta版本内核,手动安装。
Rstdio&Anaconda&N卡驱动及CUDA
Rstudio
安装很简单,可以官网下载deb包,也可以用conda安装,但是安装好后可能会发现Rstdio内无法用搜狗输入法,解决办法如下:
1
2
sudo apt install -y fcitx-frontend-qt5
sudo ln -s /usr/lib/x86_64-linux-gnu/qt5/plugins/platforminputcontexts/libfcitxplatforminputcontextplugin.so /usr/lib/rstudio/plugins/platforminputcontexts/
解决的思路就是,为新版的RStudio增加当前对应版本的输入法插件的链接库。
Anaconda
直接使用脚本安装:
1
2
3
wget https://mirrors.tuna.tsinghua.edu.cn/anaconda/archive/Anaconda3-2020.07-Linux-x86_64.sh
zsh Anaconda3-2020.07-Linux-x86_64.sh
#接下来一路yes即可,注意中间一步会将配置信息写到~/.zshrc中
然后配置,
1
vim .condarc
删除原先内容,将以下命令写入:
1
2
3
4
5
6
7
8
9
10
11
12
13
14
15
16
17
channels:
  - defaults
show_channel_urls: true
channel_alias: https://mirrors.tuna.tsinghua.edu.cn/anaconda
default_channels:
  - https://mirrors.tuna.tsinghua.edu.cn/anaconda/pkgs/main
  - https://mirrors.tuna.tsinghua.edu.cn/anaconda/pkgs/free
  - https://mirrors.tuna.tsinghua.edu.cn/anaconda/pkgs/r
  - https://mirrors.tuna.tsinghua.edu.cn/anaconda/pkgs/pro
  - https://mirrors.tuna.tsinghua.edu.cn/anaconda/pkgs/msys2
custom_channels:
  conda-forge: https://mirrors.tuna.tsinghua.edu.cn/anaconda/cloud
  msys2: https://mirrors.tuna.tsinghua.edu.cn/anaconda/cloud
  bioconda: https://mirrors.tuna.tsinghua.edu.cn/anaconda/cloud
  menpo: https://mirrors.tuna.tsinghua.edu.cn/anaconda/cloud
  pytorch: https://mirrors.tuna.tsinghua.edu.cn/anaconda/cloud
  simpleitk: https://mirrors.tuna.tsinghua.edu.cn/anaconda/cloud
然后运行conda clean -i 清除索引缓存。
如此便更换了conda源,miniconda类似。Anaconda 镜像使用帮助
此外,在安装好后,anaconda会默认在启动终端时进入base环境,若要取消,可以在~/.zshrc中将如下命令
1
2
# <<< conda initialize <<<
conda config --set auto_activate_base true
中的true修改为false
N卡驱动及CUDA
安装系统会默认安装仓库中稳定版本的NVIDIA驱动。如我特殊需求已经够用。若要更换,在软件Software & Updates->Additional Drivers更换即可。
CUDA安装,若无特殊需求,安装最新版即可:
1
2
3
4
5
6
7
wget https://developer.download.nvidia.com/compute/cuda/repos/ubuntu2004/x86_64/cuda-ubuntu2004.pin
sudo mv cuda-ubuntu2004.pin /etc/apt/preferences.d/cuda-repository-pin-600
wget https://developer.download.nvidia.com/compute/cuda/11.1.0/local_installers/cuda-repo-ubuntu2004-11-1-local_11.1.0-455.23.05-1_amd64.deb
sudo dpkg -i cuda-repo-ubuntu2004-11-1-local_11.1.0-455.23.05-1_amd64.deb
sudo apt-key add /var/cuda-repo-ubuntu2004-11-1-local/7fa2af80.pub
sudo apt-get update
sudo apt-get -y install cuda
安装好后还需配置环境变量,将下面命令写进~/.zshrc最后:
1
export PATH=/usr/local/cuda-11.1/bin${PATH:+:${PATH}}
遇到问题参考cuda安装官方文档
conda安装
如果是做深度学习,也可以直接使用conda创建虚拟环境,直接用conda安装特定版本的cuda, 以配合pytorch/tensorflow。
写在后面
感谢大家看到这里,希望大家都可以顺顺利利。倘若遇到问题建议善用搜索(必应),也可以找科服同学寻求帮助。
本文是小编从以往几次配置过程中总结出来的,参考了大量的博客,这里感谢他们。大部分内容都努力注了参考,也有部分疏漏,请见谅。最后,推送排版使用了mdnice在线版,很好用,十分感谢。